TrinityCore Boost Compile Error

آموزش های برنامه نویسی و الکترونیک و الکترومکانیک
subquery / If you want to receive all fields from two tables
SELECT * FROM terms WHERE id IN
   (SELECT term_id FROM terms_relation WHERE taxonomy = "categ")
SELECT t.id, t.name, t.slug, tr.description, tr.created_at, tr.updated_at
FROM terms AS t
INNER JOIN terms_relation AS tr
ON t.id = tr.term_id AND tr.taxonomy = "categ"using System;
using Ozeki.Media.MediaHandlers;
using Ozeki.VoIP;
using Ozeki.VoIP.SDK;
namespace ozeki.voip.sip.client
{
//These classes is just an example how to use OZEKI VoIP SIP SDK, what dll is added to the References in Solution Explorer
//Feel free to use the other components of this SDK
//For More information please visit : http://www.voip-sip-sdk.com and http://www.ozekiphone.com/ozeki-voip-sip-client-997.html
class CallHandlerSample
{
private ISoftPhone softPhone;
private IPhoneLine phoneLine;
private RegState phoneLineInformation;
private IPhoneCall call;
private readonly Microphone microphone;
private readonly Speaker speaker;
private readonly MediaConnector connector;
private readonly PhoneCallAudioSender mediaSender;
private readonly PhoneCallAudioReceiver mediaReceiver;
/// <summary>
/// Event triggered when the registered softphone has called
/// </summary>
public event EventHandler<VoIPEventArgs<IPhoneCall>> IncomingCallReceived;
/// <summary>
/// Event the softphone has successfully registered
/// </summary>
public event EventHandler RegistrationSucceded;
/// <summary>
/// Handler of making call and receiving call
/// </summary>
/// <param name="registerName">The SIP ID what will registered into your PBX</param>
/// <param name="domainHost">The address of your PBX</param>
public CallHandlerSample(string registerName, string domainHost)
{
microphone = Microphone.GetDefaultDevice();
speaker = Speaker.GetDefaultDevice();
connector = new MediaConnector();
mediaSender = new PhoneCallAudioSender();
mediaReceiver = new PhoneCallAudioReceiver();
InitializeSoftPhone(registerName, domainHost);
}
/// <summary>
///It initializes a softphone object with a SIP PBX, and it is for requisiting a SIP account that is nedded for a SIP PBX service. It registers this SIP
///account to the SIP PBX through an ’IphoneLine’ object which represents the telephoneline.
///If the telephone registration is successful we have a call ready softphone. In this example the softphone can be reached by dialing the registername.
/// </summary>
/// <param name="registerName">The SIP ID what will registered into your PBX</param>
/// <param name="domainHost">The address of your PBX</param>
private void InitializeSoftPhone(string registerName, string domainHost)
{
try
{
softPhone = SoftPhoneFactory.CreateSoftPhone(5700, 5800);
softPhone.IncomingCall += softPhone_IncomingCall;
phoneLine = softPhone.CreatePhoneLine(new SIPAccount(true, registerName, registerName, registerName, registerName, domainHost, 5060));
phoneLine.RegistrationStateChanged += phoneLine_PhoneLineInformation;
softPhone.RegisterPhoneLine(phoneLine);
}
catch (Exception ex)
{
Console.WriteLine("You didn't give your local IP adress, so the program won't run properly.\n {0}", ex.Message);
}
}
/// <summary>
/// Create and start the call to the dialed number
/// </summary>
/// <param name="dialedNumber"></param>
public void Call(string dialedNumber)
{
if (phoneLineInformation != RegState.RegistrationSucceeded)
{
Console.WriteLine("Phone line state is not valid!");
return;
}
if (string.IsNullOrEmpty(dialedNumber))
return;
if (call != null)
return;
call = softPhone.CreateCallObject(phoneLine, dialedNumber);
WireUpCallEvents();
call.Start();
}
/// <summary>
/// Occurs when phone line state has changed.
/// </summary>
/// <param name="sender"></param>
/// <param name="e"></param>
private void phoneLine_PhoneLineInformation(object sender, RegistrationStateChangedArgs e)
{
phoneLineInformation = e.State;
Console.WriteLine("Register name:" + ((IPhoneLine)sender).SIPAccount.RegisterName);
if (e.State == RegState.RegistrationSucceeded)
{
Console.WriteLine("Registration succeeded. Online.");
OnRegistrationSucceded();
}
else
{
Console.WriteLine("Current state:" + e.State);
}
}
/// <summary>
/// Occurs when an incoming call request has received.
/// </summary>
/// <param name="sender"></param>
/// <param name="e"></param>
private void softPhone_IncomingCall(object sender, VoIPEventArgs<IPhoneCall> e)
{
Console.WriteLine("Incoming call from {0}", e.Item.DialInfo);
call = e.Item;
WireUpCallEvents();
OnIncomingCallReceived(e.Item);
}
/// <summary>
/// Occurs when the phone call state has changed.
/// </summary>
/// <param name="sender"></param>
/// <param name="e"></param>
private void call_CallStateChanged(object sender, CallStateChangedArgs e)
{
Console.WriteLine("Call state changed: " + e.State);
switch (e.State)
{
case CallState.InCall:
ConnectDevicesToCall();
break;
case CallState.Completed:
DisconnectDevicesFromCall();
WireDownCallEvents();
call = null;
break;
case CallState.Cancelled:
WireDownCallEvents();
call = null;
break;
}
}
private void OnRegistrationSucceded()
{
var handler = RegistrationSucceded;
if (handler != null)
handler(this, EventArgs.Empty);
}
private void OnIncomingCallReceived(IPhoneCall item)
{
var handler = IncomingCallReceived;
if (handler != null)
handler(this, new VoIPEventArgs<IPhoneCall>(item));
}
/// <summary>
/// Connecting the microphone and speaker to the call
/// </summary>
private void ConnectDevicesToCall()
{
if (microphone != null)
microphone.Start();
connector.Connect(microphone, mediaSender);
if (speaker != null)
speaker.Start();
connector.Connect(mediaReceiver, speaker);
mediaSender.AttachToCall(call);
mediaReceiver.AttachToCall(call);
}
/// <summary>
/// Disconnecting the microphone and speaker from the call
/// </summary>
private void DisconnectDevicesFromCall()
{
if (microphone != null)
microphone.Stop();
connector.Disconnect(microphone, mediaSender);
if (speaker != null)
speaker.Stop();
connector.Disconnect(mediaReceiver, speaker);
mediaSender.Detach();
mediaReceiver.Detach();
}
/// <summary>
/// It signs up to the necessary events of a call transact.
/// </summary>
private void WireUpCallEvents()
{
if (call != null)
{
call.CallStateChanged += ( call_CallStateChanged );
}
}
/// <summary>
/// It signs down from the necessary events of a call transact.
/// </summary>
private void WireDownCallEvents()
{
if (call != null)
{
call.CallStateChanged -= (call_CallStateChanged);
}
}
~CallHandlerSample()
{
if (softPhone != null)
softPhone.Close();
WireDownCallEvents();
}
}
}
Asterisk is an open source framework for building communications applications. Asterisk turns an ordinary computer into a communications server. Asterisk powers IP PBX systems, VoIP gateways, conference servers and other custom solutions. It is used by small businesses, large businesses, call centers, carriers and government agencies, worldwide. Asterisk is free and open source. Asterisk is sponsored by Digium.
You can use below command for system update after successful root login.
# yum update
Once your system is patched with latest updates, you have to install some packages including development tools and other packages that are necessary for its successful operation. You can easily do this by using the below command that will install its all required packages included all dependencies.
# yum install gcc gcc-c++ php-xml php php-mysql php-pear php-mbstring mariadb-devel mariadb-server mariadb sqlite-devel lynx bison gmime-devel psmisc tftp-server httpd make ncurses-devel libtermcap-devel sendmail sendmail-cf caching-nameserver sox newt-devel libxml2-devel libtiff-devel audiofile-devel gtk2-devel uuid-devel libtool libuuid-devel subversion kernel-devel kernel-devel-$(uname -r) git subversion kernel-devel php-process crontabs cronie cronie-anacron wget vim

Installed:
  audiofile-devel.x86_64 1:0.3.6-4.el7            bind.x86_64 32:9.9.4-72.el7               bison.x86_64 0:3.0.4-2.el7
  gcc-c++.x86_64 0:4.8.5-36.el7                   git.x86_64 0:1.8.3.1-20.el7               gtk2-devel.x86_64 0:2.24.31-1.el7
  httpd.x86_64 0:2.4.6-88.el7.centos              libtiff-devel.x86_64 0:4.0.3-27.el7_3     libtool.x86_64 0:2.4.2-22.el7_3
  libuuid-devel.x86_64 0:2.23.2-59.el7            libxml2-devel.x86_64 0:2.9.1-6.el7_2.3    lynx.x86_64 0:2.8.8-0.3.dev15.el7
  mariadb.x86_64 1:5.5.60-1.el7_5                 mariadb-devel.x86_64 1:5.5.60-1.el7_5     mariadb-server.x86_64 1:5.5.60-1.el7_5
  ncurses-devel.x86_64 0:5.9-14.20130511.el7_4    newt-devel.x86_64 0:0.52.15-4.el7         php.x86_64 0:5.4.16-46.el7
  php-mbstring.x86_64 0:5.4.16-46.el7             php-mysql.x86_64 0:5.4.16-46.el7          php-pear.noarch 1:1.9.4-21.el7
  php-process.x86_64 0:5.4.16-46.el7              php-xml.x86_64 0:5.4.16-46.el7            sendmail.x86_64 0:8.14.7-5.el7
  sendmail-cf.noarch 0:8.14.7-5.el7               sqlite-devel.x86_64 0:3.7.17-8.el7        subversion.x86_64 0:1.7.14-14.el7
  tftp-server.x86_64 0:5.2-22.el7                 uuid-devel.x86_64 0:1.6.2-26.el7

Dependency Installed:
  apr.x86_64 0:1.4.8-3.el7_4.1                                         apr-util.x86_64 0:1.5.2-6.el7
  atk-devel.x86_64 0:2.28.1-1.el7                                      audiofile.x86_64 1:0.3.6-4.el7
  autoconf.noarch 0:2.69-11.el7                                        automake.noarch 0:1.13.4-3.el7
  cairo-devel.x86_64 0:1.15.12-3.el7                                   expat-devel.x86_64 0:2.1.0-10.el7_3
  fontconfig-devel.x86_64 0:2.13.0-4.3.el7                             freetype-devel.x86_64 0:2.8-12.el7
  fribidi-devel.x86_64 0:1.0.2-1.el7                                   gdk-pixbuf2-devel.x86_64 0:2.36.12-3.el7
  gl-manpages.noarch 0:1.1-7.20130122.el7                              glib2-devel.x86_64 0:2.56.1-2.el7
  graphite2-devel.x86_64 0:1.3.10-1.el7_3                              harfbuzz-devel.x86_64 0:1.7.5-2.el7
  httpd-tools.x86_64 0:2.4.6-88.el7.centos                             keyutils-libs-devel.x86_64 0:1.5.8-3.el7
  krb5-devel.x86_64 0:1.15.1-34.el7                                    libX11-devel.x86_64 0:1.6.5-2.el7
  libXau-devel.x86_64 0:1.0.8-2.1.el7                                  libXcomposite-devel.x86_64 0:0.4.4-4.1.el7
  libXcursor-devel.x86_64 0:1.1.15-1.el7                               libXdamage-devel.x86_64 0:1.1.4-4.1.el7
  libXext-devel.x86_64 0:1.3.3-3.el7                                   libXfixes-devel.x86_64 0:5.0.3-1.el7
  libXft-devel.x86_64 0:2.3.2-2.el7                                    libXi-devel.x86_64 0:1.7.9-1.el7
  libXinerama-devel.x86_64 0:1.1.3-2.1.el7                             libXrandr-devel.x86_64 0:1.5.1-2.el7
  libXrender-devel.x86_64 0:0.9.10-1.el7                               libXxf86vm-devel.x86_64 0:1.1.4-1.el7
  libcom_err-devel.x86_64 0:1.42.9-13.el7                              libdrm-devel.x86_64 0:2.4.91-3.el7
  libglvnd-core-devel.x86_64 1:1.0.1-0.8.git5baa1e5.el7                libglvnd-devel.x86_64 1:1.0.1-0.8.git5baa1e5.el7
  libglvnd-opengl.x86_64 1:1.0.1-0.8.git5baa1e5.el7                    libicu-devel.x86_64 0:50.1.2-17.el7
  libpng-devel.x86_64 2:1.5.13-7.el7_2                                 libselinux-devel.x86_64 0:2.5-14.1.el7
  libsepol-devel.x86_64 0:2.5-10.el7                                   libstdc++-devel.x86_64 0:4.8.5-36.el7
  libverto-devel.x86_64 0:0.2.5-4.el7                                  libxcb-devel.x86_64 0:1.13-1.el7
  libzip.x86_64 0:0.10.1-8.el7                                         m4.x86_64 0:1.4.16-10.el7
  mailcap.noarch 0:2.1.41-2.el7                                        mesa-libEGL-devel.x86_64 0:18.0.5-3.el7
  mesa-libGL-devel.x86_64 0:18.0.5-3.el7                               openssl-devel.x86_64 1:1.0.2k-16.el7
  pango-devel.x86_64 0:1.42.4-1.el7                                    pcre-devel.x86_64 0:8.32-17.el7
  perl-Compress-Raw-Bzip2.x86_64 0:2.061-3.el7                         perl-Compress-Raw-Zlib.x86_64 1:2.061-4.el7
  perl-DBD-MySQL.x86_64 0:4.023-6.el7                                  perl-DBI.x86_64 0:1.627-4.el7
  perl-Data-Dumper.x86_64 0:2.145-3.el7                                perl-Error.noarch 1:0.17020-2.el7
  perl-Git.noarch 0:1.8.3.1-20.el7                                     perl-IO-Compress.noarch 0:2.061-2.el7
  perl-Net-Daemon.noarch 0:0.48-5.el7                                  perl-PlRPC.noarch 0:0.2020-14.el7
  perl-TermReadKey.x86_64 0:2.30-20.el7                                perl-Test-Harness.noarch 0:3.28-3.el7
  perl-Thread-Queue.noarch 0:3.02-2.el7                                php-cli.x86_64 0:5.4.16-46.el7
  php-common.x86_64 0:5.4.16-46.el7                                    php-pdo.x86_64 0:5.4.16-46.el7
  pixman-devel.x86_64 0:0.34.0-1.el7                                   procmail.x86_64 0:3.22-36.el7_4.1
  slang-devel.x86_64 0:2.2.4-11.el7                                    subversion-libs.x86_64 0:1.7.14-14.el7
  uuid.x86_64 0:1.6.2-26.el7                                           xorg-x11-proto-devel.noarch 0:2018.4-1.el7
  xz-devel.x86_64 0:5.2.2-1.el7                                        zlib-devel.x86_64 0:1.2.7-18.el7

Complete!
No package gmime-devel available.
Solution:
# yum install epel-release

# yum install gmime-devel

Retrieving key from file:///etc/pki/rpm-gpg/RPM-GPG-KEY-EPEL-7
Importing GPG key 0x352C64E5:
 Userid     : "Fedora EPEL (7) <epel@fedoraproject.org>"
 Fingerprint: 91e9 7d7c 4a5e 96f1 7f3e 888f 6a2f aea2 352c 64e5
 Package    : epel-release-7-11.noarch (@extras)
 From       : /etc/pki/rpm-gpg/RPM-GPG-KEY-EPEL-7
Is this ok [y/N]: y
Running transaction check
Running transaction test
Transaction test succeeded
Running transaction
  Installing : gmime-2.6.23-1.el7.x86_64                                                                                                                            1/2
  Installing : gmime-devel-2.6.23-1.el7.x86_64                                                                                                                      2/2
  Verifying  : gmime-2.6.23-1.el7.x86_64                                                                                                                            1/2
  Verifying  : gmime-devel-2.6.23-1.el7.x86_64                                                                                                                      2/2

Installed:
  gmime-devel.x86_64 0:2.6.23-1.el7

Dependency Installed:
  gmime.x86_64 0:2.6.23-1.el7

Complete!
After successful operation you will see the list of installed packages and updates including all its required dependencies.
After installation by default we can connect to the database without using any password. So, first we will enable/start mariadb services as shown in below image, so that we can setup its root password.
# systemctl start mariadb
# systemctl enable mariadb
Created symlink from /etc/systemd/system/multi-user.target.wants/mariadb.service to /usr/lib/systemd/system/mariadb.service.

# systemctl status mariadb
● mariadb.service - MariaDB database server
   Loaded: loaded (/usr/lib/systemd/system/mariadb.service; enabled; vendor preset: disabled)
   Active: active (running) since Wed 2019-01-09 12:49:21 PST; 21s ago
 Main PID: 25923 (mysqld_safe)
   CGroup: /system.slice/mariadb.service
           ├─25923 /bin/sh /usr/bin/mysqld_safe --basedir=/usr
           └─26085 /usr/libexec/mysqld --basedir=/usr --datadir=/var/lib/mysql
Once the MariaDB services are fine, run the below command to setup its root password and remove anonymous user, test database and disallow remote user login.
# mysql_secure_installation

NOTE: RUNNING ALL PARTS OF THIS SCRIPT IS RECOMMENDED FOR ALL MariaDB
      SERVERS IN PRODUCTION USE!  PLEASE READ EACH STEP CAREFULLY!

In order to log into MariaDB to secure it, we'll need the current
password for the root user.  If you've just installed MariaDB, and
you haven't set the root password yet, the password will be blank,
so you should just press enter here.

Enter current password for root (enter for none):
OK, successfully used password, moving on...

Setting the root password ensures that nobody can log into the MariaDB
root user without the proper authorisation.

Set root password? [Y/n] y
New password:
Re-enter new password:
Password updated successfully!
Reloading privilege tables..
 ... Success!

By default, a MariaDB installation has an anonymous user, allowing anyone
to log into MariaDB without having to have a user account created for
them.  This is intended only for testing, and to make the installation
go a bit smoother.  You should remove them before moving into a
production environment.

Remove anonymous users? [Y/n] y
 ... Success!

Normally, root should only be allowed to connect from 'localhost'.  This
ensures that someone cannot guess at the root password from the network.

Disallow root login remotely? [Y/n] y
 ... Success!

By default, MariaDB comes with a database named 'test' that anyone can
access.  This is also intended only for testing, and should be removed
before moving into a production environment.

Remove test database and access to it? [Y/n] y
 - Dropping test database...
 ... Success!
 - Removing privileges on test database...
 ... Success!

Reloading the privilege tables will ensure that all changes made so far
will take effect immediately.

Reload privilege tables now? [Y/n] y
 ... Success!

Cleaning up...

All done!  If you've completed all of the above steps, your MariaDB
installation should now be secure.

Thanks for using MariaDB!
You may now access the database as shown below:
# mysql -uroot -p
Enter password:
Welcome to the MariaDB monitor.  Commands end with ; or \g.
Your MariaDB connection id is 10
Server version: 5.5.60-MariaDB MariaDB Server

Copyright (c) 2000, 2018, Oracle, MariaDB Corporation Ab and others.

Type 'help;' or '\h' for help. Type '\c' to clear the current input statement.

MariaDB [(none)]>
Jansson is a C library for encoding, decoding and manipulating JSON data. Let’s download, unpack and compile it using the below command.
We will get below issue and I am mentioning its solution as well.
configure: *** Please install the ‘libjansson’ development package or
configure: *** use ‘./configure –with-jansson-bundled’
# wget http://www.digip.org/jansson/releases/jansson-2.7.tar.gz
To extract this package use below command.
# tar -zxvf jansson-2.7.tar.gz
Then change directory and configure the package as follows.
# cd jansson-2.7/
# ./configure --prefix=/usr
Now to compile the configured package we are required to use below ‘make’ and ‘make install’ command within the same directory to compile fully functional Jansson library.
# make clean
# make && make install
# ldconfig
Here we go with most important download that is Asterisk. Let’s download its current latest package from their official web link Asterisk Download Page. We will be using ‘wget’ command to download its package, so change your current directory and run the command as shown below.
# wget http://downloads.asterisk.org/pub/telephony/asterisk/asterisk-13-current.tar.gz
32M     asterisk-13-current.tar.g
Using below commands unpack its package, change directory and then run its configuration command .
# tar -zxvf asterisk-13-current.tar.gz
# cd asterisk-13.24.1/
# ./configure --libdir=/usr/lib64

checking build system type... x86_64-pc-linux-gnu
checking host system type... x86_64-pc-linux-gnu
checking for gcc... gcc
checking whether the C compiler works... yes
checking for C compiler default output file name... a.out
checking for suffix of executables...
checking whether we are cross compiling... no
checking for suffix of object files... o
checking whether we are using the GNU C compiler... yes
checking whether gcc accepts -g... yes
checking for gcc option to accept ISO C89... none needed
checking how to run the C preprocessor... gcc -E
checking for grep that handles long lines and -e... /bin/grep
checking for egrep... /bin/grep -E
checking for ANSI C header files... yes
Upon successful completion of asterisk installation you will find its logo as shown below.
configure: Menuselect build configuration successfully completed

               .$$$$$$$$$$$$$$$=..
            .$7$7..          .7$$7:.
          .$$:.                 ,$7.7
        .$7.     7$$$$           .$$77
     ..$$.       $$$$$            .$$$7
    ..7$   .?.   $$$$$   .?.       7$$$.
   $.$.   .$$$7. $$$$7 .7$$$.      .$$$.
 .777.   .$$$$$$77$$$77$$$$$7.      $$$,
 $$$~      .7$$$$$$$$$$$$$7.       .$$$.
.$$7          .7$$$$$$$7:          ?$$$.
$$$          ?7$$$$$$$$$$I        .$$$7
$$$       .7$$$$$$$$$$$$$$$$      :$$$.
$$$       $$$$$$7$$$$$$$$$$$$    .$$$.
$$$        $$$   7$$$7  .$$$    .$$$.
$$$$             $$$$7         .$$$.
7$$$7            7$$$$        7$$$
 $$$$$                        $$$
  $$$$7.                       $$  (TM)
   $$$$$$$.           .7$$$$$$  $$
     $$$$$$$$$$$$7$$$$$$$$$.$$$$$$
       $$$$$$$$$$$$$$$$.

configure: Package configured for:
configure: OS type  : linux-gnu
configure: Host CPU : x86_64
configure: build-cpu:vendor:os: x86_64 : pc : linux-gnu :
configure: host-cpu:vendor:os: x86_64 : pc : linux-gnu :
Now in the next few steps we will configure Asterisk for its necessary modules.
In order to setup your menu items, let’s run the below command and then choose the appropriate options.
[root@centos-7 asterisk-13.5.0]# make menuselect
Once you run this command, a new window will be opened where you can will see that for the most part , all the necessary modules are already included . You can add something or remove, when you select a module there is a brief description of its purpose. In the Add-ons to enable mp3 support module select ‘format_mp3’ as shown below.

Add-on Module
Then move to the next Core Sound Packages and select the formats of Audio packets as shown in the image.

Sound Packages
Then select all the packages from the “Music On Hold Packages” and then form the “Extra Sound Packages choose the 4 that includes a first module containing EN and the choose the “Save and Exit” button to proceed for the next step.
Now run the following command to download the mp3 decoder library into the source tree.
# contrib/scripts/get_mp3_source.sh

A    addons/mp3
A    addons/mp3/MPGLIB_TODO
A    addons/mp3/mpg123.h
A    addons/mp3/layer3.c
A    addons/mp3/mpglib.h
A    addons/mp3/decode_ntom.c
A    addons/mp3/interface.c
A    addons/mp3/MPGLIB_README
A    addons/mp3/common.c
A    addons/mp3/huffman.h
A    addons/mp3/tabinit.c
A    addons/mp3/Makefile
A    addons/mp3/README
A    addons/mp3/decode_i386.c
A    addons/mp3/dct64_i386.c
Exported revision 202.
Now we will proceed with installation of selected modules using the ‘make command’.
# make
   [CC] app_mysql.c -> app_mysql.o
   [LD] app_mysql.o -> app_mysql.so
   [CC] cdr_mysql.c -> cdr_mysql.o
   [LD] cdr_mysql.o -> cdr_mysql.so
   [CC] res_config_mysql.c -> res_config_mysql.o
   [LD] res_config_mysql.o -> res_config_mysql.so
Building Documentation For: third-party channels pbx apps codecs formats cdr cel bridges funcs tests main res addons
 +--------- Asterisk Build Complete ---------+
 + Asterisk has successfully been built, and +
 + can be installed by running:              +
 +                                           +
 +                make install               +
 +-------------------------------------------+
So, Asterisk has been successfully built, now run the command as shown in the image to install asterisk.
# make install
In response to the above command you will be greeted with below put at the end of installation.
 +---- Asterisk Installation Complete -------+
 +                                           +
 +    YOU MUST READ THE SECURITY DOCUMENT    +
 +                                           +
 + Asterisk has successfully been installed. +
 + If you would like to install the sample   +
 + configuration files (overwriting any      +
 + existing config files), run:              +
 +                                           +
 + For generic reference documentation:      +
 +    make samples                           +
 +                                           +
 + For a sample basic PBX:                   +
 +    make basic-pbx                         +
 +                                           +
 +                                           +
 +-----------------  or ---------------------+
 +                                           +
 + You can go ahead and install the asterisk +
 + program documentation now or later run:   +
 +                                           +
 +               make progdocs               +
 +                                           +
 + **Note** This requires that you have      +
 + doxygen installed on your local system    +
 +-------------------------------------------+
Here we will run the below commands to install sample configuration files as indicated above.
# make samples
# make config
You can create a separate user and give him the right to work with Asterisk in order to start its services with its own user and group. To do so let’s run the below command.
# useradd -m asterisk
# chown asterisk.asterisk /var/run/asterisk
# chown -R asterisk.asterisk /etc/asterisk
# chown -R asterisk.asterisk /var/{lib,log,spool}/asterisk
# chown -R asterisk.asterisk /usr/lib64/asterisk
# systemctl restart asterisk
# systemctl enable asterisk
asterisk.service is not a native service, redirecting to /sbin/chkconfig.
Executing /sbin/chkconfig asterisk on
# systemctl status asterisk
Let’s connect to the MySQL MariaDB and create new user and database then provide it all privileges using the following commands.
# mysql -u root -p
Enter password:*******
Welcome to the MariaDB monitor.  Commands end with ; or \g.
Your MariaDB connection id is 2
Server version: 5.5.60-MariaDB MariaDB Server

Copyright (c) 2000, 2018, Oracle, MariaDB Corporation Ab and others.

Type 'help;' or '\h' for help. Type '\c' to clear the current input statement.

MariaDB [(none)]> create user 'asterisk'@'localhost' identified by 'password';
Query OK, 0 rows affected (0.30 sec)

MariaDB [(none)]> create database asterisk;
Query OK, 1 row affected (0.00 sec)

MariaDB [(none)]> GRANT ALL PRIVILEGES ON asterisk.* TO asterisk@localhost IDENTIFIED BY 'password';
Query OK, 0 rows affected (0.03 sec)

MariaDB [(none)]> flush privileges;
Query OK, 0 rows affected (0.00 sec)

MariaDB [(none)]>
Launch Asterisk for the first time after its setup on Centos 7 using below command.
# asterisk -r
Asterisk 13.24.1, Copyright (C) 1999 - 2014, Digium, Inc. and others.
Created by Mark Spencer <markster@digium.com>
Asterisk comes with ABSOLUTELY NO WARRANTY; type 'core show warranty' for details.
This is free software, with components licensed under the GNU General Public
License version 2 and other licenses; you are welcome to redistribute it under
certain conditions. Type 'core show license' for details.
=========================================================================
Connected to Asterisk 13.24.1 currently running on localhost (pid = 45755)
localhost*CLI>
Now we will configure asterisk configuration files for dialing hello-world. Go to asterisk main configuration directory and take backup of following files as follows:
cd /etc/asterisk
# mv sip.conf sip.conf.orig
# mv extensions.conf extensions.conf.orig
Create new sip.conf configuration file and edit below mentioned changes.
# vim sip.conf
[general]
port=5060 bindaddr=0.0.0.0 [1000] type=friend host=dynamic secret=1000
Create new extensions.conf configuration file and add lines as follows.
# vim extensions.conf
[default]
exten => 999,1,Answer() exten => 999,2,Playback(hello-world) exten => 999,3,Hangup() ;exten => number that is dialed,step,function
Now reload the asterisk to effect the recent changes.
# asterisk -r
localhost*CLI> reload
Add the details on softphone. Here I am using x-lite softphone for testing.

X-Lite Sip Account Creation
When phone will be successfully configured, we will show Available as shown below.

User Configured on X-Lite
Now dial 999 for hello-world message.

X-Lite Hello World
Open asterisk command line and then dial 999 from soft phone. If we will be successful then we will get following logs.
  == Using SIP RTP CoS mark 5
       > 0x7fac3c008cb0 -- Strict RTP learning after remote address set to: 192.168.15.28:56164
    -- Executing [999@default:1] Answer("SIP/1000-00000000", "") in new stack
       > 0x7fac3c008cb0 -- Strict RTP switching to RTP target address 192.168.15.28:56164 as source
    -- Executing [999@default:2] Playback("SIP/1000-00000000", "hello-world") in new stack
    -- <SIP/1000-00000000> Playing 'hello-world.ulaw' (language 'en')
    -- Executing [999@default:3] Hangup("SIP/1000-00000000", "") in new stack
  == Spawn extension (default, 999, 3) exited non-zero on 'SIP/1000-00000000'
Asterisk 13 (PBX) has been successfully installed on CentOS 7 with its required modules. We have now tested the all above installation with the hello-world dialing. Next I will be writing an article on how to make call between two phones. Stay tuned.
ari.conf
|
Disable firewall
To view the current status of the FirewallD service you can use the firewall-cmd command:
sudo firewall-cmd --stateIf the FirewallD service is running on your CentOS system the command above will print the following message:
running
You can temporarily stop the FirewallD service with the following command:
sudo systemctl stop firewalldHowever this change will be valid for the current runtime session only.
To permanently disable the firewall on your CentOS 7 system, follow the steps below:
sudo systemctl stop firewalldsudo systemctl disable firewalldThe output from the command above will look something like this:Removed symlink /etc/systemd/system/multi-user.target.wants/firewalld.service. Removed symlink /etc/systemd/system/dbus-org.fedoraproject.FirewallD1.service.sudo systemctl mask --now firewalldAs you can see from the output the mask command simply creates a symlink from the firewalld service to /dev/null:Created symlink from /etc/systemd/system/firewalld.service to /dev/null.In this tutorial, you learned how to stop and permanently disable the firewall on a CentOS 7 machine.
You may also want to check out our tutorial on how to install iptables on CentOS 7
Disable Selinux
sudo vi /etc/sysconfig/selinuxsip Config
[root@voip ~]# nano /etc/asterisk/sip.conf
GNU nano 2.3.1 File: /etc/asterisk/sip.conf
allow=h263p ; for pc
allow=h264 ; for mobile
allow=gsm
allow=alaw
maxcallbitrate=1024
[1000]
type=friend
host=dynamic
secret=1000
# echo > /etc/asterisk/sip.conf
Edit the sip.conf configuration file.
# vi /etc/asterisk/sip.conf
Here is the file content.
[general]
allowguest=no
srvlookup=no
udpbindaddr=0.0.0.0
tcpenable=no
canreinvite = no
dtmfmode=auto
[ramal-voip](!)
type=friend
context=INTERNO
host=dynamic
disallow=all
allow=ulaw
allow=alaw
allow=g729
[100](ramal-voip)
secret=pass100
callerid=”Vegeto” <100>
[200](ramal-voip)
secret=pass200
callerid=”Kakarot” <200>
Next, we need to create the dial plan.
Delete the content of the extensions.conf configuration file
# echo > /etc/asterisk/extensions.conf
Edit the extensions.conf configuration file.
# vi /etc/asterisk/extensions.conf
Here is the file content.
[general]
[INTERNO]
exten => 100,1,Dial(SIP/100)
exten => 200,1,Dial(SIP/200)
You should restart Asterisk manually and verify the service status.
# echo > /etc/asterisk/sip.conf
Edit the sip.conf configuration file.
# vi /etc/asterisk/sip.conf
Here is the file content.
[general]
allowguest=no
srvlookup=no
udpbindaddr=0.0.0.0
tcpenable=no
canreinvite = no
dtmfmode=auto
[ramal-voip](!)
type=friend
context=INTERNO
host=dynamic
disallow=all
allow=ulaw
allow=alaw
allow=g729
[100](ramal-voip)
secret=pass100
callerid=”Vegeto” <100>
[200](ramal-voip)
secret=pass200
callerid=”Kakarot” <200>
Next, we need to create the dial plan.
Delete the content of the extensions.conf configuration file
# echo > /etc/asterisk/extensions.conf
Edit the extensions.conf configuration file.
# vi /etc/asterisk/extensions.conf
Here is the file content.
Tested Sip Config
[INTERNO]
exten => 100,1,Dial(SIP/100)
exten => 200,1,Dial(SIP/200)
You should restart Asterisk manually and verify the service status.
# service asterisk stop
# service asterisk start
# service asterisk status
Firewall
iptables -A INPUT -p tcp --dport 22 -m state --state NEW -m recent --set --name SSH
iptables -A INPUT -p tcp --dport 22 -m state --state NEW -j SSH_WHITELIST
iptables -A INPUT -p tcp --dport 22 -m state --state NEW -m recent --update --seconds 60 --hitcount 4 --rttl --name SSH -j ULOG --ulog-prefix SSH_brute_force
iptables -A INPUT -p tcp --dport 22 -m state --state NEW -m recent --update --seconds 60 --hitcount 4 --rttl --name SSH -j DROP
Learning
exten => {name or number of the extension},{priority},{Action to be carried out}
exten => 500,1,Answer()
IM Message Configuration
[msg]
exten => send_msg,1,NoOp()
same => n,Answer()
same => n,Set(MESSAGE_DATA(X-Movial-Content)=application/x-movial-control\;forwarding=true)
same => n,MessageSend(sip:127.0.0.1:5060)
same => n,Hangup()

; = SIP MESSAGE only works if in sip.conf "accept_outofcall_message=yes" is set! =
exten => _.,1,GotoIf($[${LEN(${MESSAGE(from)})} < 1]?nomessage)
exten => _.,n,NoOp(Message from: ${MESSAGE(from)})
exten => _.,n,NoOp(Message to: ${MESSAGE(to)})
exten => _.,n,NoOp(Message body: ${MESSAGE(body)})
exten => _.,n,Set(ACTUALTO=${CUT(MESSAGE(to),@,1)})
exten => _.,n,MessageSend(${ACTUALTO},${MESSAGE(from)})
;exten => _.,n,NoOp(Send status is ${MESSAGE_SEND_STATUS})
;exten => _.,n,GotoIf($["${MESSAGE_SEND_STATUS}" != "SUCCESS"]?sendfailedmsg)
exten => _.,n,GotoIf($["${MESSAGE_SEND_STATUS}" != "SUCCESS"]?sendfailedmsg)
exten => _.,n,Hangup()
;
; Handle failed messaging
exten => _.,n(sendfailedmsg),Set(MESSAGE(body)="[${STRFTIME(${EPOCH},%d%m%Y-%H:%M:%S)}] Your message to ${EXTEN} has failed. Retry later.")
exten => _.,n,Set(ME_1=${CUT(MESSAGE(from),<,2)})
exten => _.,n,Set(ACTUALFROM=${CUT(ME_1,@,1)})
exten => _.,n,MessageSend(${ACTUALFROM},ServiceCenter)
exten => _.,n,Hangup()
File: /var/lib/asterisk/agi-bin/astqueue.sh
#!/bin/bash
#VARIABLES
maxretry=100
retryint=30
#
#CONSTANTS
ERRORCODE=0
d_unique=`date +%s`
d_friendly=`date +%T_%D`
astbin=`which asterisk`
myrandom=$[ ( $RANDOM % 1000 )  + 1 ]
#
function bail(){
    echo "SMS:[$ERRORCODE] $MSGOUT. Runtime:$d_friendly. UniqueCode:$d_unique"
    exit $ERRORCODE
}
while test -n "$1"; do
    case "$1" in
        -SRC)
            source="$2"
            shift
           ;;
        -DST)
            dest="$2"
            shift
           ;;
        -MSG)
            message="$2"
            shift
           ;;
        -TIME)
            originaltime="$2"
            shift
           ;;
esac
shift
done
#
#
if [[ "$source" == "" ]]; then
    echo "ERROR: No source. Quitting."
    ERRORCODE=1
    bail
fi
if [[ "$dest" == "" ]]; then
    echo "ERROR: No usable destination. Quitting."
    ERRORCODE=1
    bail
fi
if [[ "$message" == "" ]]; then
    echo "ERROR: No message specified.Quitting."
    ERRORCODE=1
    bail
fi
#
# generate call file
mydate=`date +%d%m%y`
logdate=`date`
#
# Check to see if extension exists
destexten=`echo $dest | cut -d @ -f1 | cut -d : -f2`
ifexist=`$astbin -rx "sip show peers" | grep -c $destexten`if [[ "$ifexist" == "0" ]]; then
    echo "Destination extension don't exist, exiting.."
    ERRORCODE=1
    bail
fi
# If that conditions passes, then we will queue the message,
# Todo: write other conditions too to keep the sanity of the looping
filename="$destexten-$d_unique.$myrandom.call"
echo -e "Channel: Local/$destexten@app-fakeanswer
CallerID: $source
Maxretries: $maxretry
RetryTime: $retryint
Context: websms
Extension: $destexten
Priority: 1
Set: MESSAGE(body)=$message
Set: MESSAGE(to)=$dest
Set: MESSAGE(from)=$source
Set: INQUEUE=1 "> /var/spool/asterisk/tmp/$filename
# move files
chown asterisk:asterisk /var/spool/asterisk/tmp/$filename
chmod 777 /var/spool/asterisk/tmp/$filename
sleep 3
mv /var/spool/asterisk/tmp/$filename /var/spool/asterisk/outgoing/
#
ERRORCODE=0
bail
for im messaging should be checked!
File: /etc/asterisk/extensions.conf (don’t use odbc as this becomes db intensive on a large number of messages)
[websms]
exten => _X.,1,NoOp(SMS receiving dialplan invoked)
exten => _X.,n,NoOp(To ${MESSAGE(to)})
exten => _X.,n,NoOp(From ${MESSAGE(from)})
exten => _X.,n,NoOp(Body ${MESSAGE(body)})
exten => _X.,n,Set(ACTUALTO=${CUT(MESSAGE(to),@,1)})
exten => _X.,n,ExecIf($[“${ACTUALTO}” != “sip:${EXTEN}”]?Set(ACTUALTO=sip:${EXTEN}))
exten => _X.,n,MessageSend(${ACTUALTO},${MESSAGE(from)})
exten => _X.,n,NoOp(Send status is ${MESSAGE_SEND_STATUS})
exten => _X.,n,GotoIf($[“${MESSAGE_SEND_STATUS}” != “SUCCESS”]?sendfailedmsg)
exten => _X.,n,Hangup()
;
; Handle failed messaging
exten => _X.,n(sendfailedmsg),NoOp(Sending error to user)
exten => _X.,n,Set(SRC=${MESSAGE(from)})
exten => _X.,n,Set(DST=${MESSAGE(to)})
exten => _X.,n,Set(MSG=${MESSAGE(body)})
exten => _X.,n,Set(MESSAGE(body)=”[${STRFTIME(${EPOCH},,%d%m%Y-%H:%M:%S)}] Your message to ${EXTEN} has failed. Sending when extension becomes available again”)
exten => _X.,n,Set(ME_1=${CUT(MESSAGE(from),<,2)})
exten => _X.,n,Set(ACTUALFROM=${CUT(ME_1,@,1)})
exten => _X.,n,MessageSend(${ACTUALFROM},${SRC})
exten => _X.,n,GotoIf($[“${INQUEUE}” != “1”]?startq)
exten => _X.,n,Hangup()
;
exten => _X.,n(startq),NoOp(Queueing messaging for offline extensions)
exten => _X.,n,Set(MSGTIME=${STRFTIME(${EPOCH},,%d%m%Y-%H:%M:%S)})
exten => _X.,n,SYSTEM(/var/lib/asterisk/agi-bin/astqueue.sh -SRC ‘${SRC}’ -DST ‘${DST}’ -MSG ‘${MSG}’)
exten => _X.,n,Hangup()
[app-fakeanswer]
exten => _X.,1,NoCDR
exten => _X.,n,Set(DESTDEV=${EXTEN})
exten => _X.,n,Set(THISDEVSTATE=${DEVICE_STATE(SIP/${DESTDEV})})
exten => _X.,n,GotoIf($[“${THISDEVSTATE}” = “UNAVAILABLE”]?hang)
exten => _X.,n,GotoIf($[“${THISDEVSTATE}” = “UNKNOWN”]?hang)
exten => _X.,n,Answer
exten => _X.,n,Hangup()
exten => _X.,n(hang),Hangup()
File: /var/lib/asterisk/agi-bin/astqueue.sh
#!/bin/bash
#VARIABLES
maxretry=100
retryint=30
#
#CONSTANTS
ERRORCODE=0
d_unique=`date +%s`
d_friendly=`date +%T_%D`
astbin=`which asterisk`
myrandom=$[ ( $RANDOM % 1000 ) + 1 ]
#
function bail(){
echo “SMS:[$ERRORCODE] $MSGOUT. Runtime:$d_friendly. UniqueCode:$d_unique”
exit $ERRORCODE
}
while test -n “$1”; do
case “$1” in
-SRC)
source=”$2″
shift
;;
-DST)
dest=”$2″
shift
;;
-MSG)
message=”$2″
shift
;;
-TIME)
originaltime=”$2″
shift
;;
esac
shift
done
#
#
if [[ “$source” == “” ]]; then
echo “ERROR: No source. Quitting.”
ERRORCODE=1
bail
fi
if [[ “$dest” == “” ]]; then
echo “ERROR: No usable destination. Quitting.”
ERRORCODE=1
bail
fi
if [[ “$message” == “” ]]; then
echo “ERROR: No message specified.Quitting.”
ERRORCODE=1
bail
fi
#
# generate call file
mydate=`date +%d%m%y`
logdate=`date`
#
# Check to see if extension exists
destexten=`echo $dest | cut -d @ -f1 | cut -d : -f2`
ifexist=`$astbin -rx “sip show peers” | grep -c $destexten`if [[ “$ifexist” == “0” ]]; then
echo “Destination extension don’t exist, exiting..”
ERRORCODE=1
bail
fi
# If that conditions passes, then we will queue the message,
# Todo: write other conditions too to keep the sanity of the looping
filename=”$destexten-$d_unique.$myrandom.call”
echo -e “Channel: Local/$destexten@app-fakeanswer
CallerID: $source
Maxretries: $maxretry
RetryTime: $retryint
Context: websms
Extension: $destexten
Priority: 1
Set: MESSAGE(body)=$message
Set: MESSAGE(to)=$dest
Set: MESSAGE(from)=$source
Set: INQUEUE=1 “> /var/spool/asterisk/tmp/$filename
# move files
chown asterisk:asterisk /var/spool/asterisk/tmp/$filename
chmod 777 /var/spool/asterisk/tmp/$filename
sleep 3
mv /var/spool/asterisk/tmp/$filename /var/spool/asterisk/outgoing/
#
ERRORCODE=0
bail
| Configure proxy settings like follows on CentOS Client. |
| [root@client ~]# vi /etc/profile # add follows to the end (set proxy settings to the environment variables) MY_PROXY_URL=”http://prox.srv.world:3128/” HTTP_PROXY=$MY_PROXY_URL HTTPS_PROXY=$MY_PROXY_URL FTP_PROXY=$MY_PROXY_URL http_proxy=$MY_PROXY_URL https_proxy=$MY_PROXY_URL ftp_proxy=$MY_PROXY_URL export HTTP_PROXY HTTPS_PROXY FTP_PROXY http_proxy https_proxy ftp_proxy [root@client ~]# source /etc/profile # it’s OK all, but it’s possible to set proxy settings for each application like follows # for yum [root@client ~]# vi /etc/yum.conf # add to the end proxy=http://prox.srv.world:3128/ # for wget [root@client ~]# vi /etc/wgetrc # add to the end http_proxy = http://prox.srv.world:3128/ https_proxy = http://prox.srv.world:3128/ ftp_proxy = http://prox.srv.world:3128/ |
[nextend_social_login]
:Step 1:
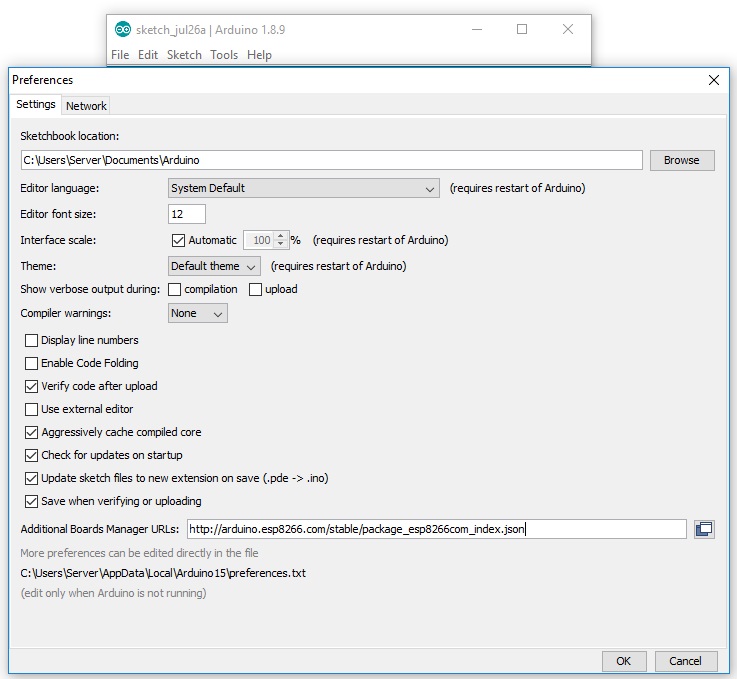
put this URL on your ardunio ide at following address
File->preferences->Additional Boards Manager URLs
URL:
http://arduino.esp8266.com/stable/package_esp8266com_index.json
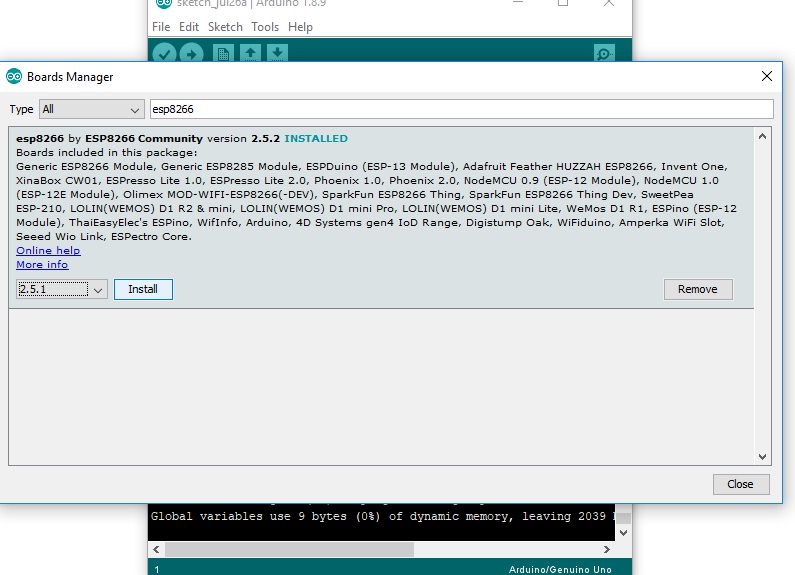
Step 2:
go to Tools->Board->Board Manager
and search ESP8266
then install last version esp8266 board manager
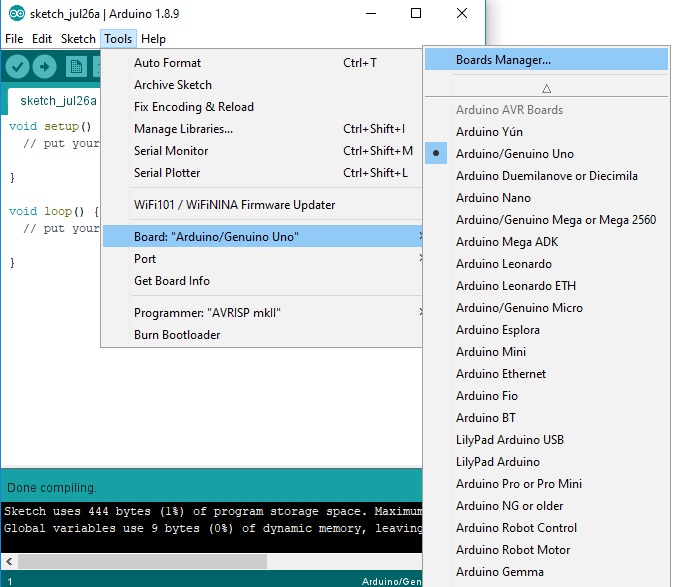
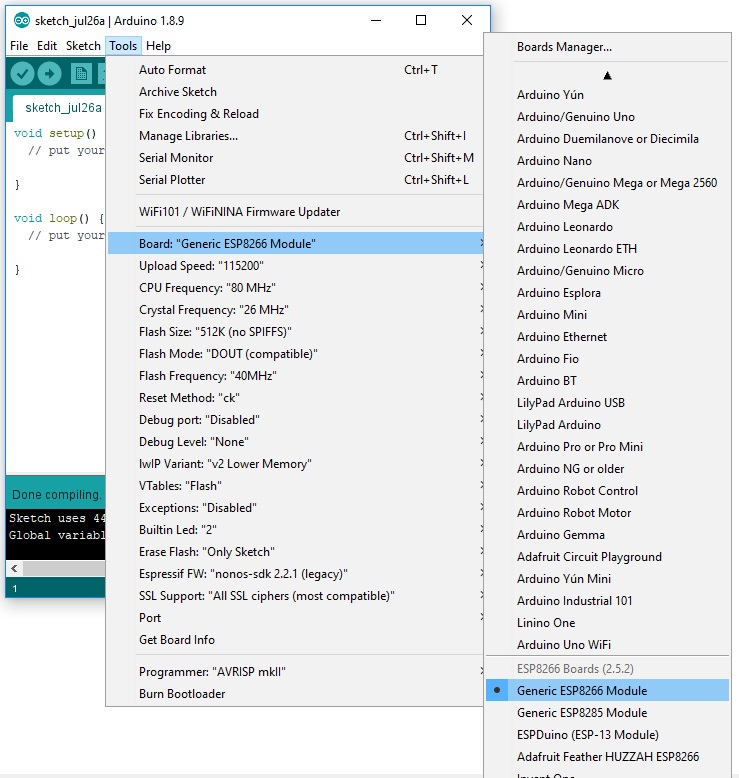
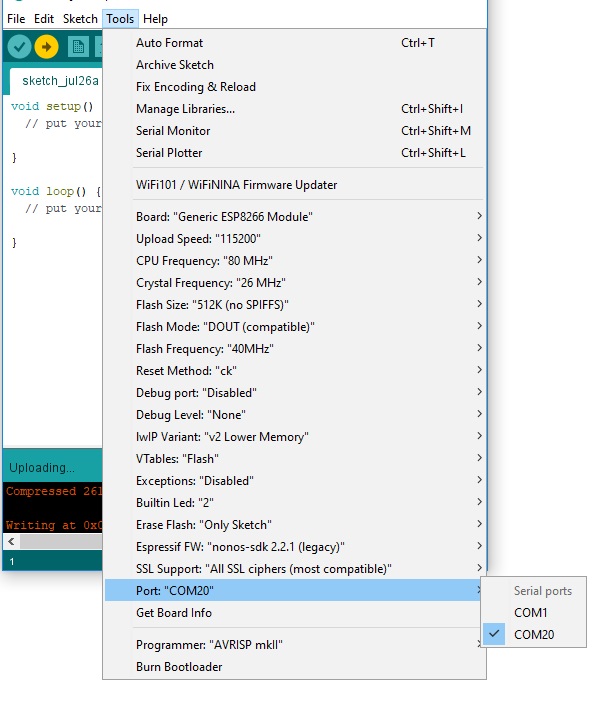
Connect ESP8266 with usb to computer and then select PORT
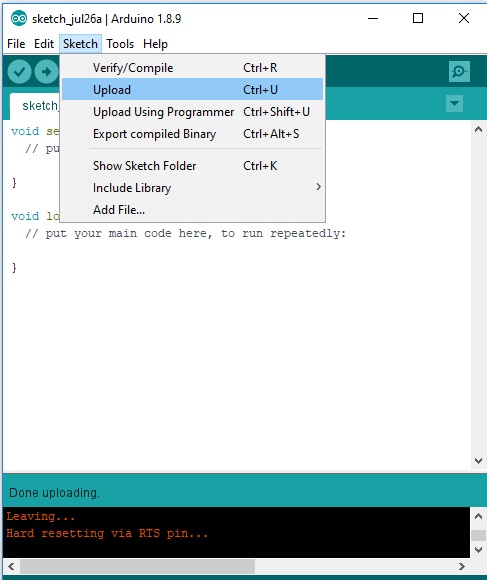
upload and DONE
پرینتر سه بعدی دستگاهی است که می تواند اشکال سه بعدی بسازد.جنس این اشیا معمولا پلاستیک از نوع pla ,abs می باشد.pla راحت تر چاپ می شود و در درجه حرارت حدود 170-190 درجه و abs در دمای 230-250 درجه اکسترود می شود.اسکترود شدن خارج شدن مواد از نازل پرینتر سه بعدی است.نازل پرینتر سه بعدی دارای هیتری برای گرم کردن آن آست و یک سنسور حرارت نیز به آن متصل است که بشود دمای نازل را کنترل کرد.نرم افزار های مختلفی برای ساخت اشکال سه بعدی هست و راحتترین و در دسترس ترینش 3D Builder است که به صورت پیش فرض در برنامه های ویندوز 10 موجود هست.البته پرینترهای سه بعدی برای کسانی که در حال تولید و خلق محصول جدید هستند و دایم در حال اجرای ایده های خود هستند و برای نمونه سازی فوق العاده هستند.
با توضیحاتی که در قبل داده شد،یک کواد کوپتر ساخته شد،
بدنه با پرینتر سه بعدی پرینت شده
4 عدد ماسفت IRF520
4 عدد موتور DC N20
آردینو ESP8266
دو باتری 18650 3.7 ولت
4 مقاومت
4 دیود
این کواد کوپتر ابتدایی توسط وای فای کنترل میشود،توسط سوکت از طریق اتصال به وای فای به نرم افزار سرور که به زبان C# نوشته شده متصل می شود و فرمان میگیرد.
فرمان ارسالی از سمت سرور در آردینو پردازش می شود و بعد به ماسفت ها اعمال می شود و ماسفت ها موتور ها را می چرخانند،و کواد کوپتر به پرواز در می آید.
استپر موتور، موتوری هستند که می توان سرعت آن ها را کنترل نمود،این موتور ها با القای جریان مقناطیسی حرکت به صورت استپ به استپ یا مرحله به مرحله دارند.

استپر موتور ها معمولا 4 سیسم و بالاتر هستند و اگر شما به استپر موتور جریان برق را متصل کنید شافت آن که قرار است بچرخد فقط سفت می شود و با دست نمی توانید آن را راحت تکان بدهید. نهایتا به اندازه استپ حرکتی مکاینیکی آن حرکت خواهد کردو مثلا استپر موتور با زاویه چرخش 1.8 درجه ، در هر بار وصل جریان حداکثر 1.8 درجه خواهید چرخید،اما اگر جریان را به صورت اصولی و با درایور مخصوص استپر موتور به آن بدهید ، استپ ها پشت سر هم قرار خواهند گرفت و مثل یک موتور معمولی می چرخد و شما متوجه قطعی های ریز بین استپ ها نمیشید.غیر از این درجه تعریف شده برای هر استپر موتور بعضی درایور ها می توانند هر استپ مکانیکی موتور را به استپ های کوچکتر تقصیم کنند،مثلا DRV8266 میتواند هر استپ را به 32 قسمت تقسیم کند،یعنی استپر موتور شما که هر دور 360 را با 200 استپ طی میکند،با این درایور هر دو را با 6400 استپ طی خواهد کرد.حالا تاثیر آن درایور در دقت موتور میباشد.مثلا اگر شما بخواهید استپر موتوری که هر استپ آن 1.8 درجه است و شما بخواهید 1 درجه حرکت کند چه باید بکنید؟ این درایور دقت حرکت و کنترل استپر موتور را تا 0.05 درجه بالا می برد.
نکته بعدی تفاوت استپر موتور ها در زمان سکون هست،زمانی که جریان برق در استپر موتور وجود داشته باشد،شافت آن محکم سر جای خود می ایستد و زمانی که به آن فرمان بدهید حرکت میکند.مثلا جرثقیلی را در نظر بگیرید که خواهد جسمی را از روی زمین بلند کند،آن را نگه دارد، بچرخد و در قسمتی دیگر پایین بیاورد،استپر موتور این امکان را به شما می دهد ولی اگر موتور دی سی معمولی باشد زمانی که جریانش وصل است می چرخد و زمانی که جریانش را قطع می کنید؟دیگر قدرتی ندارد.
در انواع پرینتر های سه بعدی و دستگاه های سی ان سی و … از همین موتور ها استفاده می شود.
فرض کنید شما می خواهید یک بالابر بسازید